Step by Step Guide to set up MaxCDN correctly on your WordPress site
 By Hired Author
MaxCDN, as popularly known, is a content delivery network (CDN) provider, situated in Los Angeles, California. It emphasized on reducing the latency in the rich content delivery. MaxCDN actually strives to maintain regional edge servers where customer files are rightly replicated in multiple locations all over the world. In MaxCDN, dynamic routing logic strictly instructs the end user’s browser to display a copy of the same customer’s rich content files from the location where there is close proximity to the end user. Basically, MaxCDN hosts Nginx servers in Asia, Europe and North America. It utilizes the Anycast stateless routing for the nearest content delivery with over multiple 10 Gbits connections. MaxCDN is mainly used by consumer and home office users with the result of the re-branding of HDDN and the Cloud Cache product lines in December 2013. In contrast, MaxCDN enterprises are mainly targeted towards enterprise customers.
Along with the current changes applied to Google Panda algorithm, it has become mandatory to make the loading speed super fast for any page. There are several factors that affect the page loading time along with the access method. In this article, an attempt is made to correctly set up MaxCDN with WP Plugin which is a complete WordPress CDN solution. It is well-known that CDN is the short form of “Content Delivery Network” and is a way to cache content for a website that actually doesn’t change often across various servers located all over the world. It may include several scripts and images that make up different parts of the web pages which doesn’t change. As a result, whenever someone is in California and accesses a particular website through the browser, the content gets delivered to them through one of the CDN’s local server using cached content. Setting up CDN for the first time sounds like a rocket-science but in real, one can easily set up MAXCDN within few minutes of work.
Content delivery network (MAXCDN in this case) set up requires one to do few things as outlined below:
- Pull zone set up from MAXCDN
- CNAME record addition to domain
- CDN linker plugin set up
With this process, site is made to be way faster than before and all the files loaded will be served from the nearest server to the visitors. Also, the server load will automatically go down to a huge percentage. Most of the WordPress sites used are hosted on shared hosting like Dreamhost, Hostgator and Bluehost or any other site, it’s always a judicious idea to set up a CDN because this speeds up the site loading time. Site speed, being one of the main ranking matrices, is difficult to ignore.
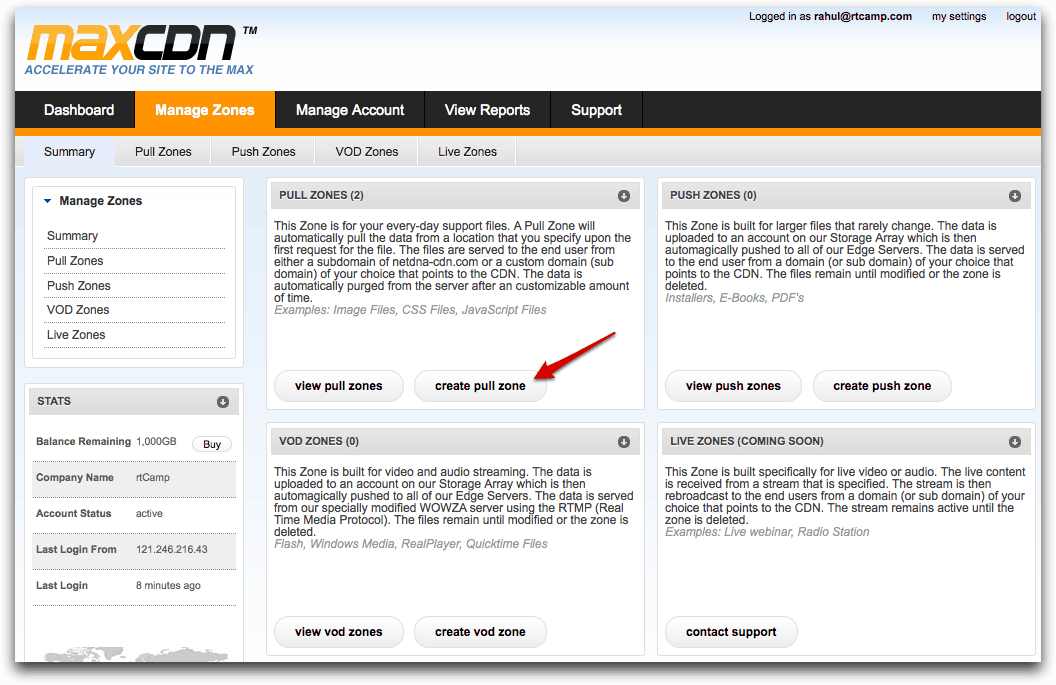
First one has to login to the MaxCDN account. Then from the MaxCDN dashboard menu one has to jump to the Manage Zones option. Finally one has to click on the Create Pull Zone option.
Then on the next screen one has to enter few important things required to create a pull zone as shown below.
The Pull Zone can be given any name. Only thing to note is that it has to be unique with three characters long and without spaces, much like the username. Moreover, the original Server URL needs to be linked to the homepage.
The custom CDN domain is optional and is recommended for the branding. One can use any of the unused sub-domain such as cdn.example.com.
Label is also Optional in nature. Basically ,MaxCDN allows one to create a number of pull zones. To save usage, Compression is used which is enabled if the bandwidth is on the account.
CNAME record creation
- When there is a success message then technically it can be said that the CDN is ready to be used. Although for the branding part , one has to create sub domain and must create a CNAME which needs to be verified.
- As the steps needed to create the CNAME record gets changed due to the various domain registrar, one can easily use services like just-ping.com to verify whether the CNAME record is successfully created. The moment one becomes sure of the CNAME record created, one should go ahead to the next step.
- Basically there are manywordpress plugins present for CDN but this w3 Total cache is the most simple to use. One can use this only in case someone is using the other plugin also.
- In order to configure the wordpress, one must use the CDN which have been created in the above steps. Installation of w3 Total Cache is a necessity, if it is not already installed.
Lastly , go to Settings >> w3 Total Cache options page to find General Settings page and scroll downwards to CDN settings menu.
- Enable CDN and select“Mirror” as CDN Type. Click “Save Changes”
- You will be next prompted to configure“Replace default hostname with”field under “CDN Settings”. (see screenshot below)
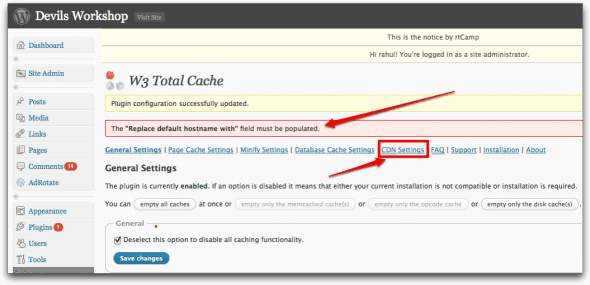
- Click on“CDN Settings” and you will see a new set of options.
Leave a Reply